Disclaimer: Any actions you take from reading this post are at your own risk. This is not meant to be an exact guide on best practice, rather than my own experience.
Context
I am not a web developer.
Being the IT guy within the family means I get asked if I can help with anything that involves a plug. One of my family members asked me a while back if I could create a new website for their business and, fancying a challenge, I said yes!
I had some basic knowledge of Jekyll from having a play with it a few years back and the site only needed to be the equivalent of an online brochure, so I thought I’d give it a go and it turned out quite well!
As that went so well, why not create somewhere to put my notes in a way that can potentially help other people? Only problem is, to start a blog, you need content. As I’m struggling to think of something to launch with (I have a few bits ongoing) why not write about getting started ![]()
Jekyll
What is Jekyll?
Jekyll is a blog-aware static site generator. It allows you to create a website with little to no web development experience (hello!) using markdown to write and style your posts.
Create your Jekyll site
Jekyll have their own great guides on getting started. Once you are set up, create a site using jekyll new (site name)
After you have created your site, you could just crack on and start using it, but the default theme is a bit 90’s, so you may wish to change it. I’m using Bulma Clean theme for this site, but there are hundreds of different pre-built themes to choose from. You can find some links to repositories of themes on the Jekyll site.
Testing your site
When the initial configuration of your site is done, you can test it locally. At the root of your site, use bundle exec jekyll serve to serve your site at localhost. Your site will automatically refresh when you save any files except changes to _config.yml.
GitHub
Getting started
You should aready have a GitHub account and a basic understanding of Git. If you don’t, the Git cheat sheet might be helpful.
Uploading your site
To get your site into GitHub, there are a few steps:
- Create a GitHub repository
- Initialise a Git repository for your site using
git init - Stage all files in the repository using
git add . - Commit your changes using
git commit -m 'Initial commit' - Add the remote repository using either the HTTPS/SSH link shown in the GitHub repository
- Push your changes using
git push -u origin main
Azure
Creating a Static Web App
Before you start, you should already have:
- A GitHub repository containing your site
- A Microsoft 365 tenant
- An active Azure subscription
To host the site, you need to create a Static Web App
- Go to portal.azure.com
- Click Create a Resource
-
Search for and select Static Web App
-
Choose the correct subscription and click Create

- Choose or create a Resource Group
- Enter a name for your app
- Choose the free plan
- Set the source as GitHub and connect your account
-
Select your Organiation, Repository and Branch

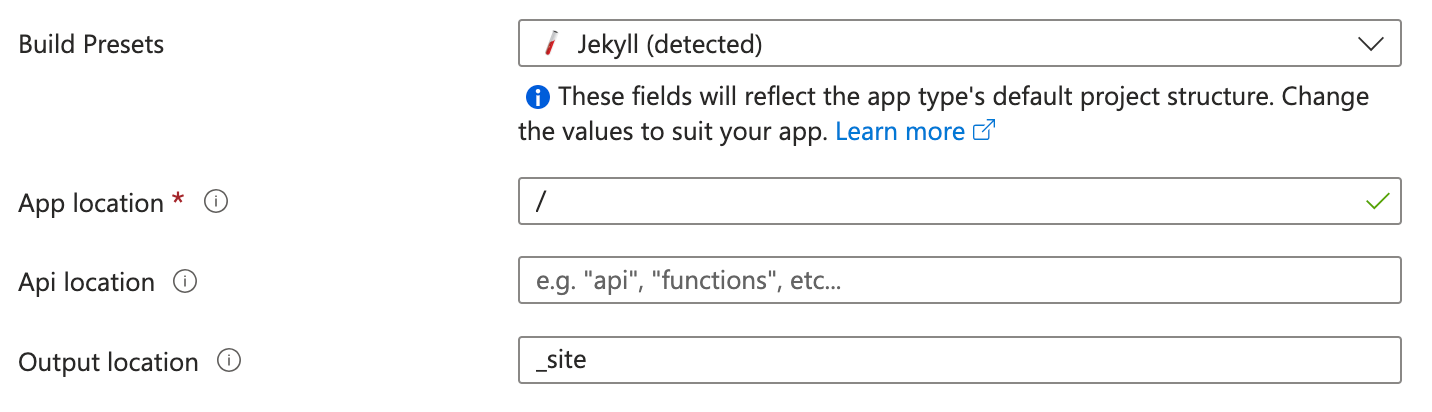
- Scroll down and set the Build details
- Build presets: Jekyll
- App location: /
- Output location: _site
- Under Deployment configuration, set the auth policy to GitHub
- Under Advanced choose your closest region
- Create your app
Once the app is created, it will automatically create a GitHub action that will build and upload the site whenever you push or merge to the selected branch.
Fix the workflow
I’m not sure if this is a permanent bug, but I found when I first tried to deploy my site, the workflow kept failing!

I didn’t have this issue before, but I had originally tested the previous site on GitHub Pages, so that may have something to do with it. After spending a while trying to troubleshoot this, including creating a new site and uploading it without making any changes, I found that you can add the Jekyll build action to the workflow.
- Open the directory where your site is stored and run
git pull - Edit the file under
.github/workflows/it will be calledazure-static-web-apps-(default URL).yml -
After the checkout action, add:
  - name: Setup Ruby
  uses: ruby/setup-ruby@v1
  with:
      ruby-version: '3.4'
  - name: Build Jekyll site
  run: |
      bundle install
      bundle exec jekyll build
Note: make sure to use the correct Ruby version
- Commit and push your changes
Once you push, this should automatically retrigger the GitHub action. With any luck, this will fix the issue and upload your site to your Static Web App.
Testing the site
To test the site, open the resource in Azure and look for the URL:

Click on the URL to go to your site. If it loads correctly, everything has worked! ![]()
Changing the URL
Most likely, you don’t want your site to be at the auto generated URL that comes from Azure. If you do, no judgement, but I definitely didn’t anyway! On the free tier, Microsoft allow you to add 1 custom domain to each app, they will even throw in an SSL certificate for free!
- Open your app in Azure
- From the sidebar, select Custom domains under Settings
-
Click add and choose the appropriate option
My domain doesn’t use Azure DNS, so I’m choosing Custom domain on other DNS. If you have a domain on Azure DNS, or would like to buy one through Microsoft, have a look at the Microsoft Learn documentation: Custom domains with Azure Static Web Apps
- Enter your domain and select Next
- Copy the DNS details and add them to your domains DNS
- Go back to Azure and click Add